How to optimize Nvidia Control Panel settings for gaming and overall performance
Whether you’re into gaming, creative work, or just some day-to-day computing, the graphics card plays a key role in many tasks. What many people don’t know is that getting the most out of your Nvidia GPU involves knowing the best Nvidia Control Panel settings.
ContentsAre you looking for the ultimate gaming experience with higher frame rates and better visuals? We’re here to help.
Keep reading to optimize your Nvidia settings in a few quick steps.
Step 1: Update your drivers
Keeping your drivers up-to-date is the key to getting the best out of your graphics card. Before delving further into the Nvidia Control Panel, make sure that you’ve got the latest drivers that Nvidia has to offer.
Downloading Nvidia drivers is simple and can be done in two ways: via the Nvidia website or through the GeForce Experience program.
If you’re downloading straight from the Nvidia website, simply select your graphics card, press Search, and download the latest driver. If you’re not sure about the exact model of your card, check your PC specifications first.
Once the file has been downloaded, double click it and let the installation commence. During that time, your screen may go black at times — don’t worry about it.
GeForce Experience is a program that helps you update drivers, optimizes in-game settings, and more. It also alerts you when new drivers are available for download.
To use this method of updating your drivers, download the program and then install it. You may be prompted to create an account. Once that is done, simply launch GeForce Experience.
The program will automatically begin searching for new drivers. If any are found, you will be alerted at the top of the screen.
Choose Express Installation and let the drivers install. Your screen may occasionally go black during the installation — this is perfectly normal.
Step 2: Launch the Nvidia Control Panel
Before you proceed, make sure to restart your computer after the installation of new drivers.
Most owners of Nvidia graphics cards will have the Control Panel installed by default. This means that you likely won’t need to download it. However, if you will need to download it at any point, you can get it here: https://downloads.digitaltrends.com/nvidia-control-panel/windows
There are two ways to launch the Control Panel. The easiest way is to simply right-click on the desktop and choose Nvidia Control Panel from the dropdown menu.
Alternatively, launch the Windows Start menu by clicking the Windows icon at the bottom-left of your screen. You can also press the Windows button on your keyboard, located similarly near the bottom-left side.
With the Start menu open, type in Nvidia Control Panel and then press Enter.
Best Nvidia Control Panel settings for gaming and performance
You can use individual games’ settings menus to decide your GPU settings, but optimizing the settings of your Nvidia card in the Control Panel may have a huge impact on your gaming experience. Smoother gameplay and better, sharper, brighter visuals are all a possibility when the settings are properly adjusted.
The Nvidia Control Panel is easy enough to navigate, but there are so many options to choose from, it may seem confusing at first. In order to find the best Nvidia settings for gaming or simply day-to-day performance, you will need to navigate the list of settings explained below.
If you don’t need a long explanation of what each setting does and how it can improve the performance of your graphics card, refer to the bite-sized guide below:
The 3D Settings tab on the left-hand side of the Nvidia Control Panel is arguably the most important when it comes to gaming, but it’s equally important for creativity. To access all the options, simply click on Adjust Image Settings With Preview.
Below the moving Nvidia logo, select Use the Advanced 3D Image Settings and then click Apply at the bottom.
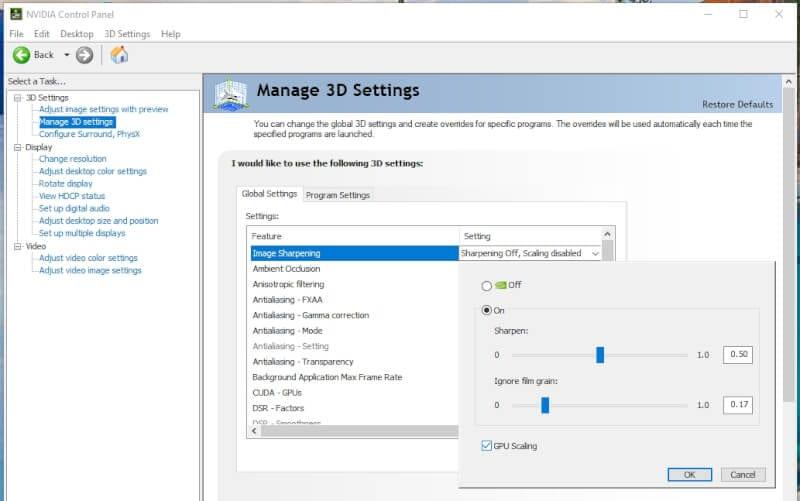
Switch to the Manage 3D Settings tab on the left side in order to edit all the available 3D settings.
This setting enhances the visuals in your games, making them appear sharper and clearer. For the best performance, turn it On.
The sharpening level should be set to around 0.50 and the film grain to around 0.17, but feel free to play around.
If you see the option to turn on GPU Scaling, do that by ticking the box. This will enable scaling to the native resolution of your display.
This setting is responsible for the shadows and environmental lighting in your games.
For the best balance between GPU load and great gameplay, set this to Performance.
Anisotropic filtering increases the visual quality of game textures when your camera is at a steep angle.
This setting should be set to Application-controlled.
This stands for Fast approximate anti-aliasing which is Nvidia’s screen-space anti-aliasing algorithm. You can turn this setting Off.
This corrects the brightness values in images enhanced by antialiasing. It’s usually best to turn this setting On.
This is a general setting related to antialiasing, which in itself is a technique that smooths out images. Leave this at Application-Controlled.
The last AA setting applies to Nvidia’s technology of applying antialiasing to transparent textures. You can usually turn this Off.
This controls the frames per second (fps) that your games and other applications will have when minimized. If you don’t have any performance issues, you can leave this Off.
If you feel you’d rather limit background frame rates, turn this on and set it to the bare minimum frame rate you want to target, such as 60 fps, or on older or weaker GPUs, 30 fps.
This setting should always be set to All, as it refers to which of the CUDA cores in your graphics card can be used.
DSR stands for Dynamic Super Resolution. This technology improves image quality by rendering the images and upscaling them to a higher resolution.
While this sounds good on paper, it’s a killer for your frame rates (fps), so it’s best to turn this setting Off.
Much like the previous DSR setting, this will only decrease your fps. As such, it’s better to turn it Off.
Low Latency Mode ensures that the frames in your game are submitted into the render queue just when the graphics card requires them. Nvidia refers to this as “just in time frame scheduling”. This results in, as the name itself suggests, lower latency and higher frame rates.
To increase your fps, turn this setting On.
This setting limits your fps to a certain number. Different games will be able to achieve different fps, and though the true limit of what you can experience will always be your monitor’s refresh rate, some games have heavily unlocked frame rates in menus, which can result in undue power drain on your GPU.

If you don’t want to limit your frame rates in any way, simply turn this setting Off. If you’d like to adjust this setting to match your monitor, keep reading.
Some competitive gamers like to set this option to double that of their monitor’s refresh rate. If you’re not sure about the refresh rate of your monitor, you can check it in Windows Settings.
In order to check your display’s refresh rate, click the Windows logo on the bottom-left side of the screen. Next, type in Advanced Display and click on View Advanced Display Info. Check the refresh rate and adjust this setting to match it. In our example, the limit would be 75.
This setting will not be visible to all users. If you can see it, you can use it to turn on Nvidia’s G-Sync. Nvidia G-Sync is responsible for adjusting your monitor’s refresh rate to become dynamic, causing display refreshes only when a frame is sent from the GPU. It solves issues such as screen tearing.
G-Sync is a welcome addition on budget computers, but it’s not needed on modern desktops and monitors. If you’re using a mid-to-high-end setup, it’s best to leave this Off. Otherwise, turn it On.
This setting removes jagged edges and smooths out graphics, resulting in improved visuals. Unfortunately, this is a small gain for the price that your frame rates may have to pay.
For gaming, we recommend that you turn this setting Off.
This option lets you choose which one of your graphics cards (if you have more than one) will be used for OpenGL. Pick your GPU from the dropdown menu and select it.
As the name implies, this setting is responsible for optimizing the power vs performance ratio of your graphics card.
If you don’t mind letting your GPU use maximum power and perhaps run a little hotter, select Prefer Maximum Performance.
When turned on, this setting reduces processor usage. It’s optimal to turn it On.
Anisotropic sample optimization limits the number of samples that are used by your GPU. Turn this setting On.
When turned on, this setting makes stationary images sharper and enables texture filtering. Toggle it to Allow.
This setting lets you optimize texture filtering to value performance. Switch it to High Performance.
Trilinear optimization will usually be on by default. It smooths out textures in your games. If it happens to be turned off, make sure to switch it to on.
Threaded optimization allows your computer to utilize several processor cores at once. Turn this to Auto.
When triple buffering is enabled, frames are rendered in one back buffer. Although there are some games that benefit from this setting, it’s best to turn it Off.
Vsync synchronizes the frame rate with your monitor’s refresh rate. As it can limit your fps, it’s better to turn it Off unless you experience severe screen tearing issues.
This setting limits the number of frames that your processor prepares ahead of your GPU being able to process it.
For optimal performance, set this to 1.
Once you have adjusted all of these settings, click Apply on the bottom right-hand side to save the changes.
Go back to the menu on the left-hand side and navigate to Configure Surround, PhysX.
On the right part of this section, you will find PhysX Settings. Switch that from Auto to the model of your GPU.
This section will help you optimize your display settings. Navigate to it on the left-hand side and go down the list as required.
Select the monitor that you are using at the top of this section. If you have multiple displays, you will have to repeat the steps for all of them.
Under Resolution, scroll down until you find the highest possible resolution in the PC section. Next, adjust the monitor’s refresh rate to the highest available.
Scroll down to the color settings and click on Use Nvidia Color Settings. Make sure that the desktop color depth is set to Highest (32-bit) and that the Output Dynamic Range is set to Full.
Click Apply to save all your changes.
This section lets you play around with the color settings on your display. All the settings here are down to your personal preference. You can adjust Brightness, Contrast, and Gamma in the first row. Feel free to move the sliders and press Apply to see the result, as the changes are easily reverted.
You can also try out Digital Vibrance. This setting will increase color saturation and make the shades brighter. A value of around 70% to 80% may look best, but this depends on the game.
If you’ve made any changes, press Apply.
You will notice that we’ve skipped over the next three sections: Rotate display, View HDCP status, and Set Up Digital Audio. All of these have no impact on gaming and won’t require adjustments.
In the Adjust Desktop Size and Position tab, pick the display you want to make changes to, and then look down toward the Scaling section.
You can choose the correct setting to pick here based on your needs.
Don’t forget to make sure that the scaling is performed on the GPU by selecting that option in the dropdown menu below. Lastly, tick the box that says Override the Scaling Mode Set By Games and Programs.
Once you’re done, press Apply.
Look back at the menu on the left-hand side. If this section is not visible to you, simply move on to the next step. If it is, it will let you decide whether or not to use Nvidia G-Sync.
Nvidia’s G-Sync synchronizes your monitor’s refresh rates to match the graphics card. However, on modern computers with powerful graphics cards and gaming monitors with higher refresh rates, this setting is almost obsolete. It can actually lower your gaming performance.
If you are playing on a budget or mid-range computer that is several years old, you can try out G-Sync by ticking the box next to Enable. However, if your PC is somewhat new, you should keep G-Sync off.
This section is only useful to users who run multiple monitor setups. If that’s not you, jump down to the next step.
In this part of the Control Panel, you will be able to change your display configuration and which displays to use. If you have two or more monitors, you can drag their icons using your mouse. This lets you pick which display will act as your primary monitor.
In general, you should drag the icons to match the physical setup of your displays. You can move them above, below, to the right, or to the left, so all kinds of monitor setups can be configured here.
This setting will help you optimize the color palette used in videos and games.
In the second question about color adjustments choose the second option — Nvidia Settings. Switch over to the Advanced tab below. Pick Full (0-255) and press Apply to save all changes.
As the last section dubbed Adjust Video Image Settings doesn’t require any changes, you are almost done. Your PC is now running on the best Nvidia Control Panel settings for gaming and overall performance.
In order to finalize the changes, quickly restart your computer. Once that’s done, run your favorite game and check to make sure that everything is stable. Feel free to go back to the Nvidia Control Panel to tweak the settings further if needed.
Quick guide to Nvidia Control Panel settings for gaming
If you want to quickly adjust your settings to increase frames per second and offer smooth gameplay, but don’t necessarily need to know what each setting does, follow the guide below.
Start by referring to steps one and two above: download the latest drivers and launch Nvidia Control Panel. Afterward, apply the following settings:
Press Apply to save all changes.
Press Apply after completing each step.
Restart your computer to finalize the changes.
}})
George Washington
Lorem ipsum dolor sit amet, consectetur adipisicing elit. Ducimus itaque, autem necessitatibus voluptate quod mollitia delectus aut, sunt placeat nam vero culpa sapiente consectetur similique, inventore eos fugit cupiditate numquam!